Thursday, 5 September 2013

STEP BY STEP TUTORIAL FOR SHORTS ( EASY)


  • MEASURING
  • CALCULATING
  • FOLDING
  • DRAFTING
  • CUTTING 
  • STITCHING


cloth needed= quarter meter (approximate)


folding of shorts is as same as the panties that we viewed on the last post.

.MEASUREMENT needed are

.1 length
.2 waist

.CALCULATION

Length= length( ur desired length)+3
waist  = waist/4 +2

.DRAFTING


    CUTTING


 STITCHING


stitch your shorts and amaze your friends.......stay tuned


Tuesday, 3 September 2013

STITCHING A PANTIES FOR YOUR BABY (easy) STEP BY STEP TUTORAL

LET THIS BE OUR FIRST STEP
              

                                                      To know the basics of sewing clothes we must learn from the basics itself.
cloth needed = half meter(approximated)


Learn to stitch a panties for your kid.. imagine your kid wearing a panties stitched by u. it is very easy if u follow the correct steps


  • 1 MEASURING
  • 2 CALCULATING
  • 3 FOLDING
  • 4 DRAFTING
  • 5 CUTTING
  • 6 STITCHING
1. measure the hip,seat and crotch 

or find       crotch =length=seat/3

                HIP=BREADTH=HIP/4+2

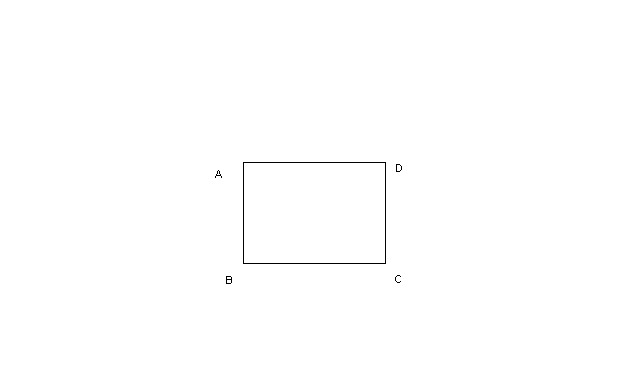
 AB = LENGTH(CROTCH)
 BC =BREADTH

2 CALCULATING

EG:        IF 20 IS HIP AND 24 IS SEAT THEN
              LENGTH       =  24/3       =8
AND     BREADTH      =  20/4+2   =7


IMAGINE  A B C D AS THE CLOTH

one of the important thing that a beginner must know is about the folding of the cloth.if the folding goes wrong u may spoil the whole cloth.so first of all it is good to try the cutting on a paper.   take only a small piece of paper which fits in ur palm,and try cutting. cut the paper in the correct folding and in the wrong  folding too. this will make u understand more about folding 


                                             3   FOLDING
CAPITAL    A B C D  IS THE  OPEN     FABRIC
small            a b c  d    is  the     folded      fabric

FIG 1    is ur cloth
FIG 2.   fold it according the arrow ,and u will get the result  as  fig 2 (B)
FIG 3.   fold it according to the arrow,and folding completed on fig 3 (B)
 

  • follow the images to fold ur cloth.see the image 4 the blue lines will have the open part of the folded cloth and the rose line have the closed part

         now u got 4 layers of fabrics , remember(hip /4) hip was divided by 4 is because ur fabric is folded as four layers  think about this as this helps u in many dress folding 


                                               DRAFTING
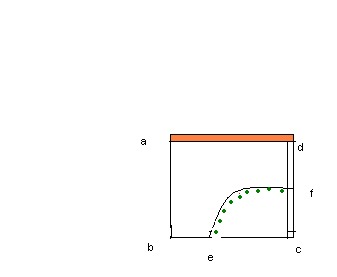
LENGTH   =8
BREADTH =7   draw a square of 8 inch length and 7 inch breadth
mark 1 inch from  'a' to insert elastic (orange shaded)
b to e = 1 and a half for children and 2 for adults
f = half of the length
join e and f .


CUTTING

cut along the dots


and open the fabric u will get the fabric as shown in the second figure ABCD.


STITCHING

  • 1, Roll and stitch the sides marked blue 
    2,  u can add frills on the curved part marked green
    fig 2


    3,join  the sides ,leaving the orange line =one inch                                                                                                            
    fig 3

    join both sides(A TO B AND B TO C)  
    4,then fold that one inch(orange shaded ) and stitch around. leave a small gap in the end to insert elastic
    length of the elastic=half of the hip size

    AFTER INSERTING ELASTIC STITCH THAT SMALL GAP ALSO ......    .TRY IT
                                                                                                                                     

Thursday, 29 August 2013

INDIAN FABRICS (BROCADE)

THIS fabric is called brocade.we can use it for saree blouse,
tops,etc


it comes like this


then we will remove the folding
 and our salesman will roll the whole fabric in a board
only experienced persons could do it


and finally


one meter costs only rs 99/-


STITCHING(winding a bobbin) tips

WITH the help of photos,we will get the clear idea


 this is bobbin 

 this is bobbin case


first open the slide and remove bobbin case from the  machine 


place the thread on the thread spool ,take the thread and rotate it on the bobbin


place the bobbin on the bobbin winter and activate the foot pedal  till the bobbin is full with thread.
 hold the thread and adjust it with your hands while the bobbin is been winded


cut the thread and place the bobbin in bobbin case
like this there should be some unwind ed thread   


now place the bobbin case inside the machine


you will hear a tick sound that indicates the bobbin is perfectly located in its place.now close the slide.

and  thread the machine 


grab and hold the thread from the needle eye .then activate the foot pedal .after 5 to 6 seconds the thread from the bobbin appears above the machine with the above thread.


 leave both threads . 

NOW  U ARE READY TO STITCH

Monday, 19 August 2013

sewing tips( threading a sewing machine) easy

when u finish practicing the first tip, u will get the balance to operate a sewing machine.
                                                         The 2nd step is threading.


                                  1. HAND WHEEL
                                  2. SPOOL PIN
                                  3 THREAD GUIDE
                                  4 TENSION DISC
                                  5 LEVER
                                  6 WIRE GUIDE
                                  7  NEEDLE    


                                   AT FIRST we have to turn the hand wheel such that the needle (7) is at the possible highest point,.this allows us to thread the needles eye quickly


Place ur thread at the spool pin from there pull thread through thread guide.Draw the thread in between the tension disc,then through lever(the lever also should be on the highest point.)and then through the wire guide

                                                  the most important part is the needle eye. Enter the thread only from the left of the needle eye to the right..otherwise ur thread will breakup
                                                                                   
                                                                                there is an easy way to thread ur needle eye ,that we will discuss later.


                                                          U HAVE NOT YET FINISHED.WE   HAVE TO SEE THE BOBBIN  SPOOLING  AND LOADING  TO FINISH THE THREADING.     .STAY TUNED. 


Saturday, 17 August 2013

Tips for beginners

                             
                     IF u dont know to operate a sewing machine follow this                                                                                                                                        


 1.take a single lined paper
 2. no need to load thread   
 3. try to stitch on the lines of paper
 4.rotate the wheel of machine only towards u (never rotate backwards)


   at first it will be difficult for u to stitch a straight line .after a practice of one hour u will be able to give a straight stitch